What is LoRA?
LoRA (Low‑Rank Adaptation) is an efficient technique for fine‑tuning generative models. Instead of retraining the entire Stable Diffusion model, it adds small trainable low‑rank matrices to the existing weights. During training, only these matrices are adjusted, which means LoRA models are much smaller and easier to train than base models like Stable Diffusion 1.5. This makes LoRA a great way to personalize the style of your image‑generation model without expensive hardware.
Data preparation: build a focused dataset
The quality of your LoRA depends heavily on the dataset you use. A well‑curated dataset helps the model learn a consistent style or character. Follow these tips when gathering your images:
- Use 40–50 high‑resolution images (512×512 or higher). Most should be close‑up portraits, with a few side and full‑body shots for variety.
- Keep backgrounds simple. Busy backgrounds confuse the model.
- Do not mix multiple characters or styles in one dataset; focus on one subject or theme per LoRA.
- Caption or tag each image with a short trigger word or phrase so you can invoke the LoRA later. Avoid long descriptions; concise tags make training easier.
Train a LoRA in ComfyUI
ComfyUI offers a visual workflow for training and testing LoRA models. The official tutorial suggests this simple process:
- Download a Stable Diffusion base checkpoint (e.g.,
dreamshaper_8.safetensors) and place it inComfyUI/models/checkpoints. - Put your LoRA training script or model in
ComfyUI/models/loras. - Import a LoRA workflow JSON and make sure the
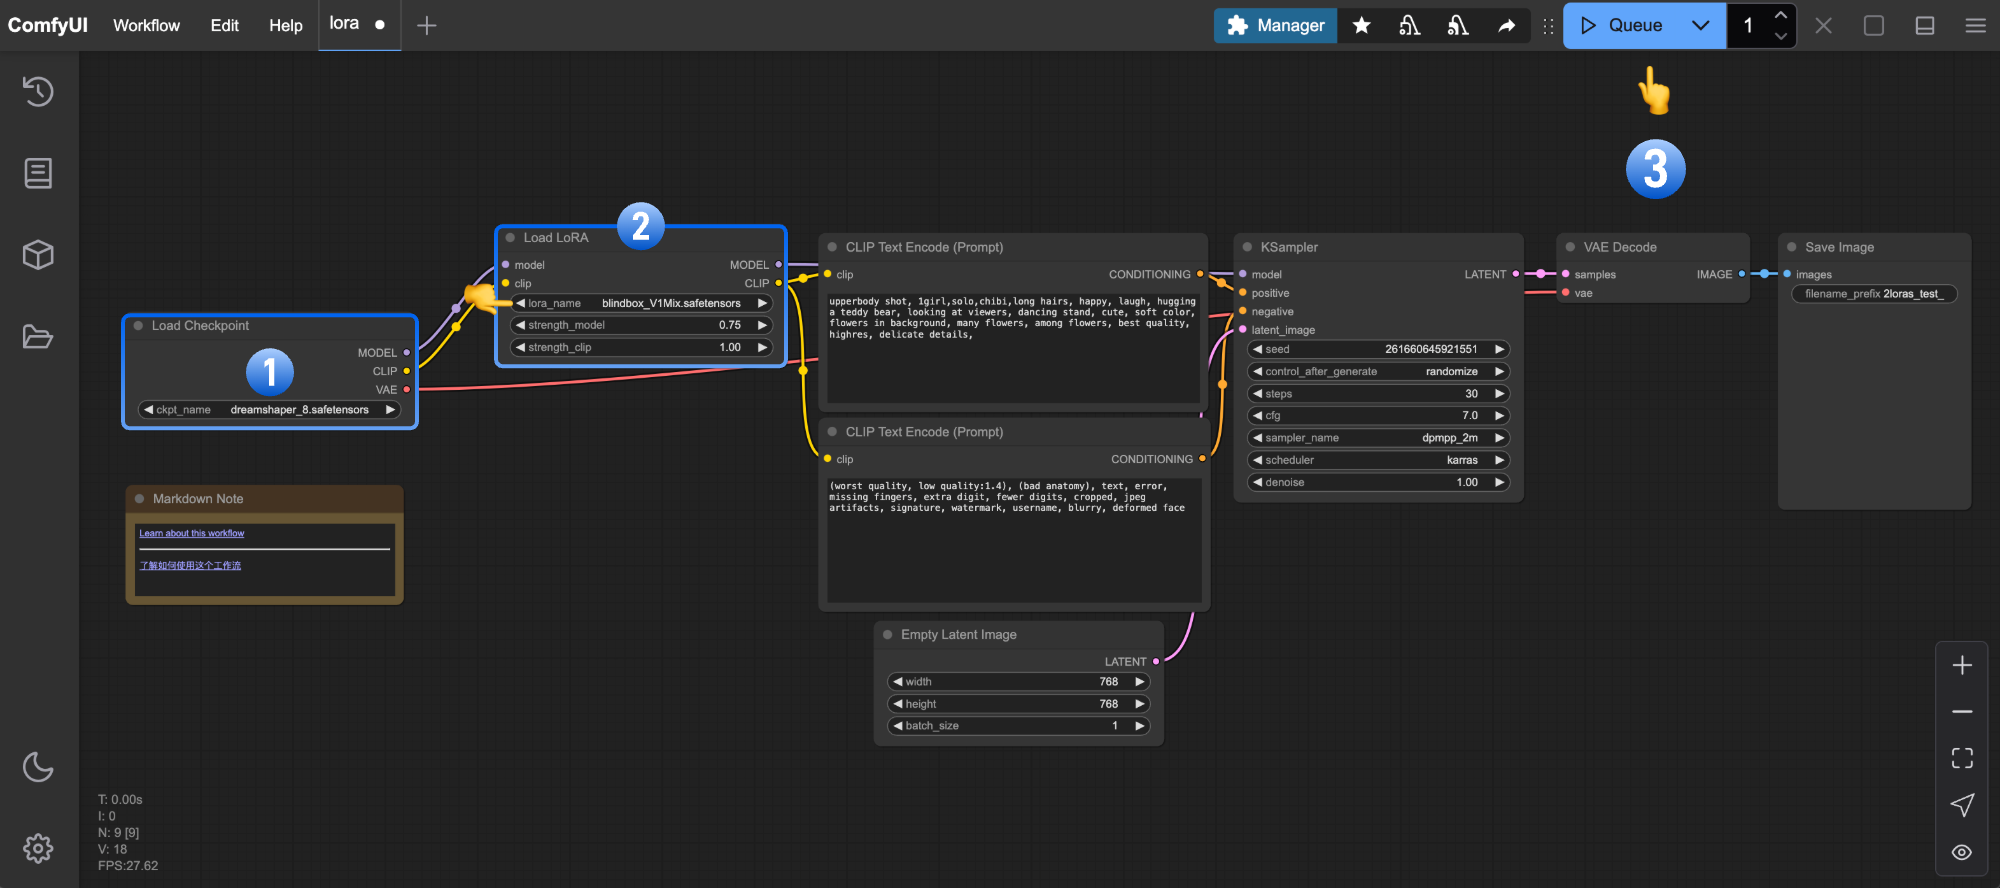
Load Checkpointnode points to your base model and theLoad LoRAnode points to your LoRA file. - Click the “Queue” button or press Ctrl + Enter to start generating images with the LoRA.
- Adjust the
strength_modelandstrength_clipsliders on theLoad LoRAnode to control how strongly the LoRA influences the generated images.
The diagram below shows how a typical LoRA workflow connects nodes like Load Checkpoint, Load LoRA, VAE Decode and Save Image.
Alternative tools and recommended training parameters
If you prefer a command‑line interface, kohya_ss and other LoRA trainer scripts are popular choices. They support Windows and Linux, allow multi‑GPU training and produce .safetensors LoRA files. Community recommendations suggest starting with these hyperparameters:
- Batch size: 1 or 2 (depends on VRAM).
- Training epochs: 8–10; more epochs can overfit.
- Rank: 96; Alpha (scaling factor): 72.
- Optimizer: adafactor or adamw8bit for lower memory use.
- Learning rate: around 1e‑4 to 2e‑4.
Always monitor training images; if outputs become too dark or saturated, reduce the learning rate or stop early.
Local host setup and hardware tips
Running LoRA training on your own machine requires a GPU with at least 8 GB of VRAM; 16 GB or more provides smoother training. Make sure your environment has:
Stable Diffusion base model: download the .safetensors checkpoint and place it in a checkpoints directory.
Python environment: install dependencies like PyTorch, Hugging Face Transformers and diffusers.
Dataset and output folders: organise your training images and specify separate directories for the resulting LoRA weights.
When using ComfyUI, store LoRA files in ComfyUI/models/loras so they appear in the Load LoRA node automatically.
What is LoRA?
LoRA (Low‑Rank Adaptation) is an efficient technique for fine‑tuning generative models. Instead of retraining the entire Stable Diffusion model, it adds small trainable low‑rank matrices to the existing weights. During training, only these matrices are adjusted, which means LoRA models are much smaller and easier to train than base models like Stable Diffusion 1.5. This makes LoRA a great way to personalize the style of your image‑generation model without expensive hardware.
Data preparation: build a focused dataset
The quality of your LoRA depends heavily on the dataset you use. A well‑curated dataset helps the model learn a consistent style or character. Follow these tips when gathering your images:
- Use 40–50 high‑resolution images (512×512 or higher). Most should be close‑up portraits, with a few side and full‑body shots for variety.
- Keep backgrounds simple. Busy backgrounds confuse the model.
- Do not mix multiple characters or styles in one dataset; focus on one subject or theme per LoRA.
- Caption or tag each image with a short trigger word or phrase so you can invoke the LoRA later. Avoid long descriptions; concise tags make training easier.
Train a LoRA in ComfyUI
ComfyUI offers a visual workflow for training and testing LoRA models. The official tutorial suggests this simple process:
- Download a Stable Diffusion base checkpoint (e.g.,
dreamshaper_8.safetensors) and place it inComfyUI/models/checkpoints. - Put your LoRA training script or model in
ComfyUI/models/loras. - Import a LoRA workflow JSON and make sure the
Load Checkpointnode points to your base model and theLoad LoRAnode points to your LoRA file. - Click the “Queue” button or press Ctrl + Enter to start generating images with the LoRA.
- Adjust the
strength_modelandstrength_clipsliders on theLoad LoRAnode to control how strongly the LoRA influences the generated images.
The diagram below shows how a typical LoRA workflow connects nodes like Load Checkpoint, Load LoRA, VAE Decode and Save Image.
Alternative tools and recommended training parameters
If you prefer a command‑line interface, kohya_ss and other LoRA trainer scripts are popular choices. They support Windows and Linux, allow multi‑GPU training and produce .safetensors LoRA files. Community recommendations suggest starting with these hyperparameters:
- Batch size: 1 or 2 (depends on VRAM).
- Training epochs: 8–10; more epochs can overfit.
- Rank: 96; Alpha (scaling factor): 72.
- Optimizer: adafactor or adamw8bit for lower memory use.
- Learning rate: around 1e‑4 to 2e‑4.
Always monitor training images; if outputs become too dark or saturated, reduce the learning rate or stop early.
Local host setup and hardware tips
Running LoRA training on your own machine requires a GPU with at least 8 GB of VRAM; 16 GB or more provides smoother training. Make sure your environment has:
- Stable Diffusion base model: download the
.safetensorscheckpoint and place it in acheckpointsdirectory. - Python environment: install dependencies like PyTorch, Hugging Face Transformers and diffusers.
- Dataset and output folders: organise your training images and specify separate directories for the resulting LoRA weights.
- When using ComfyUI, store LoRA files in
ComfyUI/models/lorasso they appear in theLoad LoRAnode automatically.
Keep your GPU drivers up to date and close other GPU‑intensive apps during training.
Conclusion
LoRA provides an accessible way to customise generative models without having to train from scratch. By carefully curating a small but focused dataset, choosing sensible hyperparameters and using tools like ComfyUI or kohya_ss, beginners can create high‑quality LoRA models on their local machines. With practice, you’ll be able to tailor styles and characters to your taste — happy training!eep your GPU drivers up to date and close other GPU‑intensive apps during training.
Conclusion
LoRA provides an accessible way to customise generative models without having to train from scratch. By carefully curating a small but focused dataset, choosing sensible hyperparameters and using tools like ComfyUI or kohya_ss, beginners can create high‑quality LoRA models on their local machines. With practice, you’ll be able to tailor styles and characters to your taste — happy training!