What is ComfyUI and why do people use it?
ComfyUI is a node-based AI creation interface for local and cloud workflows. As of June 17, 2026, the official ComfyUI GitHub describes it as an AI creation engine for visual professionals who want control over every model, parameter, and output. In plain terms, that means you connect modular blocks for loading a model, writing a prompt, sampling an image, previewing the result, and saving the file.
If you want the short answer first, ComfyUI matters because it gives creators and developers more repeatable control than a simple prompt box. Instead of hoping you remember the exact settings from a good result, you can save the workflow itself and run it again with small changes.
That makes ComfyUI especially useful for content teams, ecommerce creators, indie developers, and marketers who need more than one lucky image. It is built for repeatability, model swapping, batch generation, and structured experimentation.
Why ComfyUI feels different from simpler AI image apps
Most beginner-friendly AI image tools hide the pipeline. ComfyUI exposes it. That is why some people find it intimidating at first, but it is also why advanced users keep coming back to it.
| Approach | What you get | Main tradeoff |
|---|---|---|
| Simple prompt interface | Fast start, low friction, fewer settings | Less control and weaker repeatability |
| ComfyUI node workflow | Reusable pipelines, precise tuning, model flexibility | More setup and more concepts to learn |
The advantage is not just customization. It is operational clarity. Once you understand the basic node chain, you can build separate workflows for product mockups, social portraits, style transfer, image cleanup, or image-to-image revisions without rebuilding your process from scratch every time.
What are the official setup options in 2026?
The official ComfyUI repository currently points users to three practical ways to begin: the desktop application, the Windows portable package, and a manual install. That matters because many tutorials still assume older setup paths.
Desktop application
The official site presents the desktop application as the easiest way to get started and says it is available on Windows and macOS. If your goal is simply to learn the workflow model without managing Python packages, this is the lowest-friction path.
Windows portable package
The GitHub README says the Windows portable build is a standalone option for Nvidia GPUs or CPU-only use. It also notes that the main Nvidia portable package supports Nvidia 20-series and above, while a separate package exists for Nvidia 10-series and older GPUs. The same README also says the current portable build ships with Python 3.13 and PyTorch CUDA 13.0, and recommends updating Nvidia drivers if it does not start.
Manual install
Manual install remains the most flexible option. The official README says manual setup supports all operating systems and GPU types, including NVIDIA, AMD, Intel, Apple Silicon, and Ascend. It also notes that Python 3.13 is very well supported, while Python 3.12 can still help if some custom node dependencies lag behind.
The practical takeaway is simple: use the easiest official package that matches your hardware. Only move to manual install when you need custom dependency control, special drivers, or a development environment.
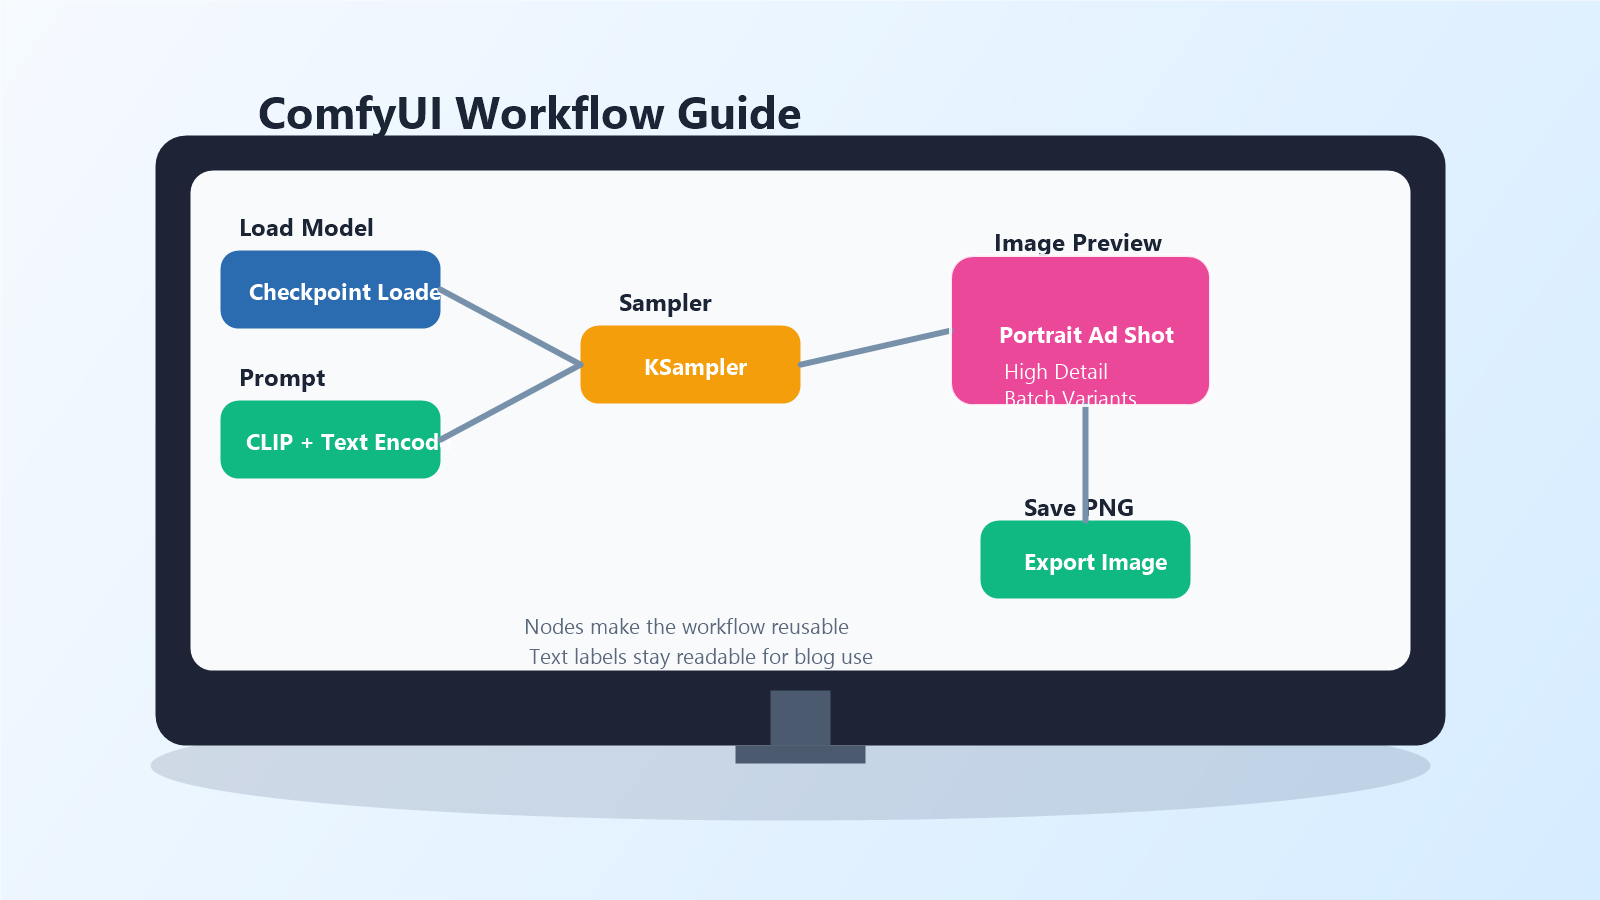
Which ComfyUI nodes matter in a first workflow?
You do not need dozens of nodes to understand ComfyUI. A solid first workflow only needs a few concepts:
- Checkpoint loader: loads the main model file.
- Text encode nodes: turns your prompt and negative prompt into conditioning.
- Latent image or image input: defines the canvas or source image.
- Sampler: runs the denoising process that creates the image.
- VAE decode: converts the latent result into a visible image.
- Save image: exports the final PNG.
Once this chain makes sense, the rest of ComfyUI becomes easier. Upscaling, control networks, LoRA loading, inpainting, or multi-pass edits are all just extensions of the same logic.
How to build a practical text-to-image workflow
The simplest productive workflow is still text-to-image. It gives you the fastest feedback loop and teaches the core graph structure.
Step 1: Load one model you can trust
For a practical 2026 starter stack, two official model families are especially relevant. The Hugging Face card for Stable Diffusion 3.5 Large says it is a Multimodal Diffusion Transformer text-to-image model with improved image quality, typography, complex prompt understanding, and resource efficiency. The same card also says it is released under the Stability Community License, so commercial teams should review licensing terms carefully.
The Hugging Face card for FLUX.1 [dev] describes it as a 12 billion parameter rectified flow transformer for text-to-image generation. That makes it a strong reference point when you want a modern open model with strong prompt-following quality.
Step 2: Start with a narrow prompt
Do not begin with a giant cinematic paragraph. Write a small, testable prompt first. For example:
clean product photo of a ceramic coffee cup on a wooden desk,
morning window light, realistic shadows, editorial ecommerce style
Then change one thing at a time: camera distance, lighting, material, brand mood, or aspect ratio. This is the fastest way to learn which node settings matter and which prompt phrases are just noise.
Step 3: Save the workflow, not just the image
This is where ComfyUI becomes more than a toy. Save the graph after you get a promising result. If your team needs ten product variations next week, the workflow is more valuable than the single file you exported today.
How image-to-image and editing workflows fit in
ComfyUI becomes much more powerful when you stop thinking only about text generation. It can also act as a structured editing environment.
For example, the official Hugging Face card for FLUX.1 Kontext [dev] describes it as a 12 billion parameter rectified flow transformer capable of editing images based on text instructions. That matters because many real creator workflows are not about generating from zero. They are about fixing composition, changing a background, preserving a subject, or iterating on an existing campaign visual.
A useful image-to-image workflow often looks like this:
- Load a reference image.
- Encode it into the graph.
- Use a prompt that describes the change, not the whole scene again.
- Lower or tune denoise strength so the structure survives.
- Preview several variants before saving.
This is one of the clearest reasons to learn ComfyUI. You get a reusable visual editing pipeline instead of repeating edits manually in disconnected tools.
What creators and marketers can actually do with ComfyUI
ComfyUI is not only for hobbyists who want to tweak every parameter. It is useful anywhere repeatable image output matters.
| Use case | Why ComfyUI works well |
|---|---|
| Product mockups | Reusable lighting, angle, and background workflows for multiple SKUs |
| Social visuals | Batch generation with controlled style changes |
| Blog images | Structured prompts and export steps for recurring editorial formats |
| Game or app concepts | Easy experimentation with styles, seeds, and model swaps |
| Image revision | Node-based editing pipelines are easier to repeat than manual prompt retries |
If you manage content production, that repeatability is the real value. It is easier to document a workflow, hand it to a teammate, and keep a consistent look across campaigns.
Common mistakes beginners make
Most ComfyUI frustration comes from workflow design mistakes, not from the tool itself.
Mistake 1: Installing too many custom nodes immediately
Start with the official core workflow first. If you install many third-party nodes before understanding the basics, debugging becomes harder and update conflicts become more likely.
Mistake 2: Mixing model types without checking compatibility
Some tutorials casually swap checkpoints, VAEs, samplers, or workflow files across model families. That can work, but it can also break. Follow model-card instructions and ComfyUI examples closely before improvising.
Mistake 3: Chasing giant prompts
Better prompts are usually more specific, not longer. Short structured prompts plus saved node settings often outperform vague cinematic paragraphs.
Prompt tip
Subject: premium skincare bottle
Scene: white stone counter with soft shadows
Style: clean ecommerce photography
Keep: readable label area, realistic reflections, no extra objects
Pros and cons of ComfyUI
| Pros | Cons |
|---|---|
| Highly reusable workflows | Steeper learning curve than a prompt-only tool |
| Strong control over model and parameter choices | Local setup can be confusing for beginners |
| Works well for repeatable creator pipelines | Custom nodes can create maintenance overhead |
| Good fit for both generation and editing | Hardware limits still matter for larger models |
Edit AI videos here
If your workflow expands from still images into reels, explainers, or ad creatives, you will also need a clean editing step after generation. Edit AI videos here: https://ai.alphatechnologies.vn. It is a practical companion when your image pipeline becomes part of a larger content production stack.
Conclusion
ComfyUI is worth learning because it turns AI image generation into a repeatable system instead of a one-off prompt experiment. As of June 17, 2026, the official project still positions it around modular control, broad hardware support, and reusable workflows, while current model cards such as Stable Diffusion 3.5 Large, FLUX.1 [dev], and FLUX.1 Kontext [dev] show why node-based pipelines remain relevant for both generation and editing.
If you want fast results with long-term control, learn one small workflow first, save it, and improve it gradually. Explore more AI tools on Aikolhub if you want to build a stack that supports image generation, editing, publishing, and content marketing together.
FAQ
Is ComfyUI good for beginners?
Yes, if you are willing to learn a few core nodes first. It is harder than simple prompt apps, but much better for repeatable workflows.
Do I need a powerful GPU to use ComfyUI?
Not always. The official project offers portable and manual options across several hardware types, but larger models will still benefit from stronger GPUs.
What model should I try first in ComfyUI?
A stable official model with clear documentation is the safest starting point. Stable Diffusion 3.5 Large and FLUX.1 [dev] are both relevant reference models with official model cards.
Can ComfyUI edit images, not just generate them?
Yes. Image-to-image and instruction-based editing workflows are a major part of why advanced users choose it.
Why should I save the workflow file?
Because the workflow preserves your process. That makes it easier to reproduce results, hand work to teammates, and scale a visual system over time.