


A convincing 24mm wide-angle lenses AI video prompt must describe camera placement, subject distance, depth layers, and straight-line behavior—not merely name a focal length. For the most reliable result, rebuild the reference as a measured scene, run a focal-length-only baseline, then add one geometry contract while keeping the seed, image, duration, and motion fixed.
This workflow treats 24mm as a full-frame-equivalent visual target. It is broad enough for an environmental portrait or tight interior, but less extreme than 14mm; the goal is readable spatial energy without turning the frame into a fisheye caricature.
Table of Contents

Start with the reconstruction brief
Do not begin by collecting lens adjectives. Begin with one shot whose success can be observed. The worked example is a five-second 16:9 clip: a courier in a rust-red jacket holds a silver case inside a concrete loft, turns toward window light, then takes one controlled step. The camera makes a slow 40-centimeter lateral track.
The courier shot
The approved opening frame must show floor in the foreground, the courier in the middle ground, and aligned doorways behind him. His face and case stay inside the central half of the image. Vertical walls remain straight, the horizon remains level, and the window stays on camera right. Those are testable constraints; “cinematic 24mm” alone is not.
What 24mm changes—and what it does not
A 24mm full-frame look includes substantial surroundings and emphasizes near-to-far scale. Used close to a foreground object, it makes that object feel large while the background recedes. Used farther back, it can create a spacious but comparatively natural environmental portrait.
Format and field of view
Sensor format matters. Sony’s official 24mm full-frame lens page specifies an 84-degree diagonal angle of view and notes that 24mm on APS-C gives roughly a 36mm full-frame-equivalent view. Nikon classifies approximately 14–35mm as wide angle on FX format. Therefore, write “24mm full-frame-equivalent” when the generator has no declared virtual sensor.
Placement creates perspective
Focal length changes field of view; camera position determines the viewpoint. If you move close to keep a face large, near features and props can dominate while the room falls away. If you back up and crop to the same framing, spatial relationships change. This is why the existing 14mm ultra-wide guide focuses on extreme depth, while this workflow uses 24mm to reconstruct a controlled interior.
Teardown the reference frame
Before prompting, inspect the reference like evidence. The question is not “Does it look wide?” but “Which visible relationships make it read as 24mm?” Write the observations beside the image so they can become acceptance checks.
Measure six visual cues
- Subject scale: the courier occupies about one-third of frame height.
- Edge safety: face, hands, and case avoid the outer 15 percent.
- Convergence: doorway edges recede but verticals remain upright.
- Depth ratio: visible foreground floor is roughly as deep as the subject zone.
- Anchor positions: window right, doorway centered, chair behind the courier.
- Light direction: one warm side source crosses from camera right.
This module separates the article from the broader wide-shot workflow, where subject scale and location function are the main task. Here, the task is reconstructing one lens-and-placement relationship.
Block camera, subject, and set
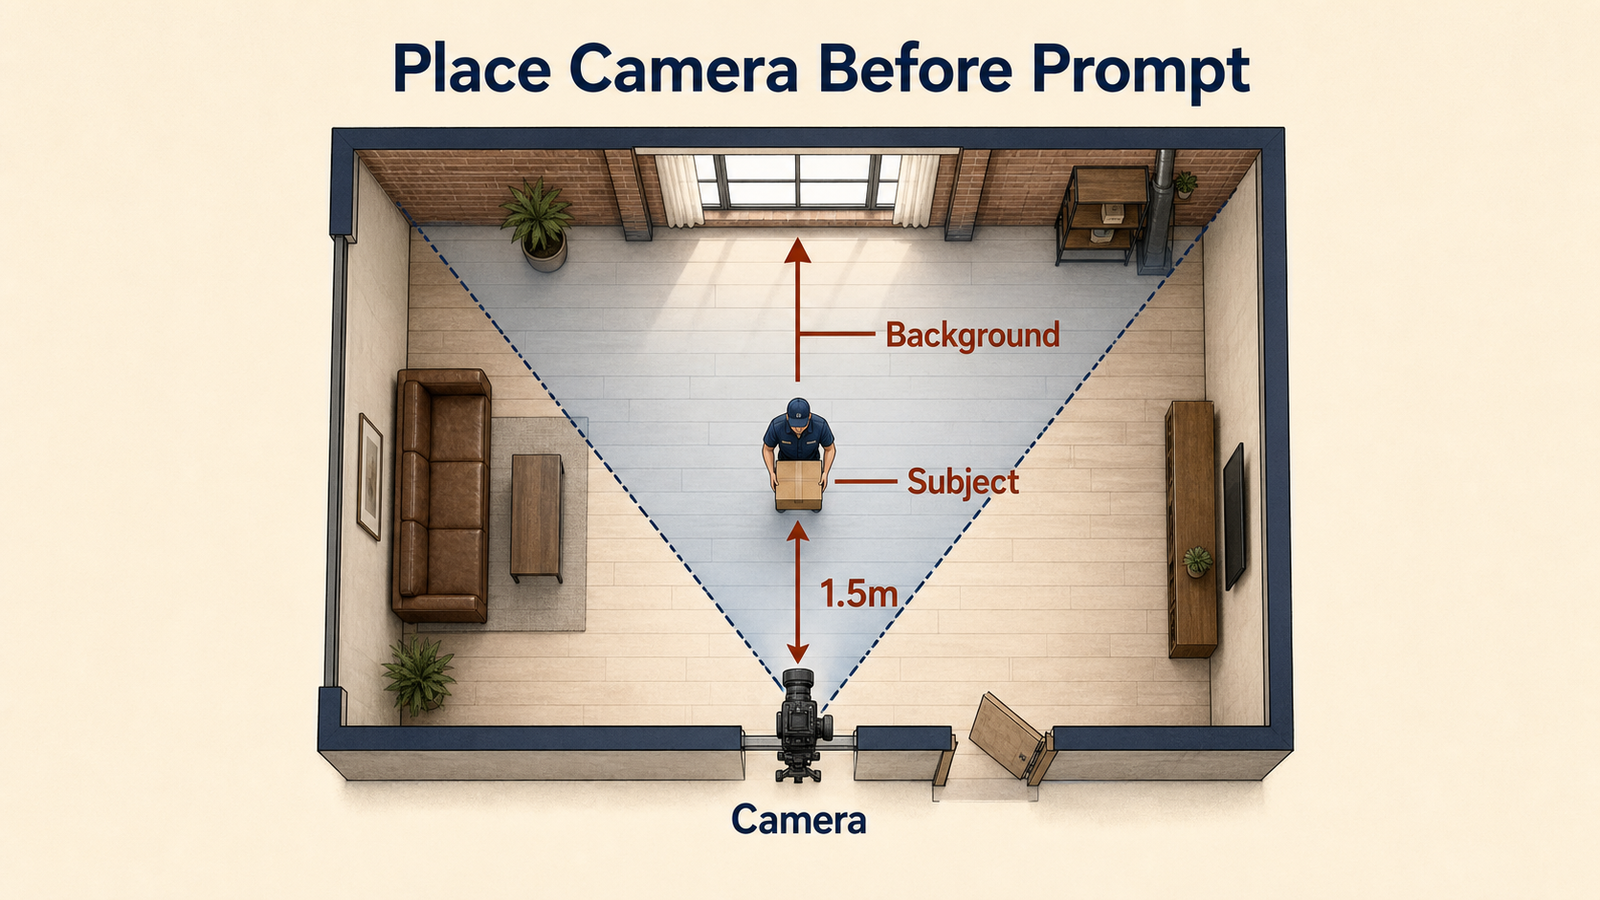
Make a simple floor plan even when the scene is generated. Put the camera on the doorway axis, start the courier about 1.5 meters away, and reserve more room behind the subject than in front. This is a repeatable starting measurement, not a universal optical law.
Use a three-zone map
- Foreground: empty floor and one case edge establish scale; nothing touches the lens.
- Subject zone: the courier stays near the center, with elbows and case clear of frame edges.
- Background: two doorway rectangles and the window create stable vanishing cues.
If the face must fill the frame, change to a longer lens look or a tighter shot. Do not push the virtual 24mm camera into the actor and then ask negative prompts to repair the resulting proportions.

Run the before/after prompt experiment
Use the same reference, model version, seed, aspect ratio, five-second duration, and 40-centimeter track for both runs. Change only the prompt contract. Some systems are not perfectly deterministic even with a fixed seed, so compare multiple pairs if the pipeline varies; the method still isolates the requested variable better than unrelated generations.
Baseline A: focal length only
Prompt A: “A courier holding a silver case in a concrete loft, cinematic 24mm wide-angle lens, slow lateral camera move, warm window light.”
Record whether the subject grows, the face stretches, verticals lean, or the background layout changes. A visually attractive result can still fail the reconstruction if it moves the window, loses the doorway axis, or invents fisheye curvature.
Reconstruction B: geometry contract
Prompt B: “Use the reference as the opening composition. 24mm full-frame-equivalent rectilinear view; camera level at chest height, about 1.5 meters from the courier. Keep his face and silver case inside the central half. Preserve straight vertical walls, centered doorway layers, window on camera right, visible foreground floor, and warm side light. The courier turns toward the window and takes one step while the camera tracks left 40 centimeters. Fixed focal look, no zoom, no roll, no fisheye curvature, no reframing.”
Reconstruction B passes only if at least five of the six teardown cues survive and the intended motion remains readable. If both runs fail, simplify the body action before changing lens language.

Build a 24mm shot contract
Use capture settings as visual targets unless the pipeline exposes real camera parameters. A prompt can suggest depth of field, cadence, and blur, but it does not create trustworthy metadata.
Starting settings table
| Choice | Starting target | Expected result | Stop condition |
|---|---|---|---|
| Lens | 24mm full-frame equivalent, rectilinear | Broad interior with controlled edge stretch | Fisheye curvature or bent doorways |
| Aperture look | f/5.6 | Courier and doorway layers remain readable | Background dissolves or focus pumps |
| Frame rate | 24 fps | Conventional cinematic cadence | Motion judder hides geometry |
| Shutter look | 180 degrees | Moderate motion blur | Case edge smears across frames |
| Camera move | 40cm slow lateral track | Gentle parallax through doorways | Walls breathe or unseen space melts |
| Light | One window source from right | Stable shape and depth | Shadow direction flips |
Copyable prompt templates
Static reference: “Environmental portrait of [subject] in [room]. 24mm full-frame-equivalent rectilinear view, camera [height] and [distance], level horizon. Foreground [anchor], subject centered away from edges, background [landmarks]. [Aperture] depth-of-field look, one motivated light from [direction]. Preserve straight verticals and natural facial proportions.”
Animation pass: “Use the reference as frame one. [Subject action] while the camera [one measured move]. Fixed focal look and exposure. Lock face, wardrobe, prop hand, foreground anchor, doorway geometry, horizon, and light direction. No zoom, roll, fisheye bend, focus pumping, cuts, or new objects.”
Choose the control path
Match the tool to the precision required. Naming 24mm in text is the weakest control; a designed reference carries visible geometry; a trajectory-conditioned system controls camera pose; a system with intrinsics can represent lens behavior more explicitly.
Four control levels
| Level | What you provide | What to trust |
|---|---|---|
| Text only | Lens and placement language | Style approximation after visual review |
| Image to video | Approved opening frame | First-frame composition, not guaranteed continuity |
| Trajectory control | Per-frame poses or drawn path | Camera direction more than exact lens identity |
| Intrinsics-aware control | Pose, focal parameters, distortion, orientation | More explicit geometry within that research pipeline |
CamI2V is an official camera-controlled image-to-video research implementation; its repository lists 256×256 and 512×320 research checkpoints. CameraCtrl conditions text-to-video generation on camera trajectories represented per frame. UCPE explicitly represents 6-DoF pose, intrinsics, lens distortion, pitch, and roll. None of those facts means a general text-to-video service exposes a calibrated 24mm control.
For a focused setup explanation, use Aikolhub’s UCPE camera-control setup guide. Keep code licenses, checkpoint terms, base-model terms, and dataset rights separate before commercial work.
Practical production workflow
- Approve the static reference and six-cue teardown.
- Save the model version, seed, aspect ratio, duration, and input order.
- Run Prompt A, then Prompt B with only the geometry contract changed.
- Reject any take that fails face, case, doorway, horizon, window, or light checks.
- Reduce action or camera travel before adding more negative terms.
- Render the best short segment, then cut around unstable boundary frames.
Diagnose placement failures
Fix observable geometry before surface polish. Adding “masterpiece,” flare, grain, or more lens names will not repair a camera placed in the wrong spot.
Symptom-to-fix clinic
| Symptom | Placement cause | Single-variable fix |
|---|---|---|
| Face or case balloons | Camera too close; subject near edge | Back up, recenter, keep the same 24mm target |
| Frame looks ordinary, not wide | No foreground anchor or deep background | Add visible floor and aligned doorway layers |
| Walls lean dramatically | Camera tilted upward or downward | Level the virtual camera; adjust height instead |
| Doorways breathe during track | Travel reveals unsupported geometry | Shorten track from 40cm to 20cm |
| Shot becomes a zoom | Scale change is underspecified | State fixed focal look and lateral translation |
| Focus hunts | Conflicting shallow-depth cues | Use f/5.6 look and lock focus on the courier |
| Background drifts | Reference landmarks are weak | Name window side and doorway count explicitly |
If the creative task is a deliberate focus change rather than lens reconstruction, use the separate rack-focus workflow so focus behavior is tested independently.
Limitations
Prompted millimeters, f-stops, shutter angles, and frame rates are often semantic cues. Exact physical reproduction requires a pipeline that exposes and preserves the relevant controls, and even research systems can warp occluded or newly revealed geometry. A fixed seed may not guarantee identical output across hardware, software revisions, or nondeterministic kernels. Use generated people and locations responsibly, obtain permission for recognizable identities, and keep provenance for source images.
Official sources checked
Claims were checked August 15, 2026 against Nikon’s focal-length guide, Sony’s official 24mm full-frame lens specifications, the official CamI2V repository and technical report, the RealCam-I2V report, the official CameraCtrl repository, and the official UCPE repository and technical report. Repository code licenses are MIT for CamI2V and UCPE and Apache-2.0 for CameraCtrl; dependent weights and models require their own review.
Edit AI videos here
After the reconstruction passes, trim unstable frames, compare A/B takes, match color, add sound, and export the finished sequence at https://ai.alphatechnologies.vn. Keep the placement map and six-cue checklist beside the edit so a revision changes one variable instead of restarting the shot.
Final recommendation
For a believable 24mm AI video shot, place the camera before polishing the prompt. Build one reference with protected edges and depth anchors, run the focal-length baseline, add the measured geometry contract, and accept only the take that preserves the same visible relationships. Explore the Aikolhub AI Video hub for related production workflows.
Frequently asked questions
Is 24mm a wide-angle lens?
Yes on full frame. Official Nikon guidance places roughly 14–35mm in the FX wide-angle range, and Sony lists an 84-degree diagonal view for its full-frame 24mm lens.
Does 24mm distort faces?
It can exaggerate facial proportions when the camera is very close or the face is near an edge. Back up, protect the central zone, and use a longer focal look for a tight portrait.
Can a prompt guarantee a true 24mm lens?
No. Text usually requests a visual style. Intrinsics-aware systems can represent focal and distortion parameters more explicitly, but the rendered result still needs inspection.
What aperture should I use for a 24mm look?
Start with an f/5.6 or f/8 depth-of-field look when the environment must stay readable. Treat the value as an aesthetic cue unless the pipeline exposes a physical aperture control.
Which camera move is safest?
A short, slow lateral track is a useful first test because it reveals parallax without demanding much unseen geometry. Reduce the distance if walls or doorways begin to breathe.


2 Comments